
With WordPress and a few simple tools, it is possible to create an internal wiki website, which will act as a central data repository for the company information.
Most of the corporate companies these days maintain an internal wiki website so as to be able to keep the company data organized and easily accessible by those who need it.
In this tutorial, we will discuss the pre-requisites, the method, and other tools and tips to build a professional and fully operational internal wiki:
Table of contents:
- WordPress for Online Wiki Websites
- The pre-requisites to create a WordPress based internal wiki
- Installing and setting up the software and the services
- Setting up the Internal Wiki Plugin
- Preparing the WordPress Internal wiki for wiki articles
- Adding the wiki articles
But before we start, outlined below are some of the main advantages of creating an internal wiki:
- Centralized system for storing & preserving company information
- Increase in the productivity of the employees
- Quicker employee onboarding as the information is easily accessilble and on hand
- Helps maintain uniformity in processes and data
- Makes it possible to keep all the employees updated and on the same page
- Easy collaboration for the data sharing and organizing
There are several other advantages of creating an internal wiki website that differs from organization to organization. Also, with the availability of several website building options, you can easily create an internal wiki on your own.
Tip: In case you want to include quiz as well for your team on your site or one of the article, you can use WordPress quiz plugin to create quiz for different purposes. Now, on to the list…
1) WordPress for Online Wiki Websites

We recommend using WordPress for building online internal wiki websites for several reasons:
- WordPress is free and open-source
- It is very easy to use, you can use the intuitive dashboard options to set up your site
- Maintaining sites with WordPress is simple
- You can get a hosting service of your choice
- It is a flexible CMS and highly scalable to accommodate new features
- WordPress themes for online wiki websites make creating internal wiki easier
- You can alternately rely on a plugin for building an internal wiki
With the right tools and WordPress, you can create an internal wiki WordPress site, at a very affordable price. Unlike the SAAS-based platform which can prove to be way more expensive.
There are many other reasons why WordPress is one of the most popular website-building tools and powers about 43% of the Internet.
2) Pre-requisites to create an internal Wiki
To build an internal wiki WordPress site, you will need the following:
- A download of the Free WordPress software
- A WordPress Theme or a wiki WordPress plugin
- Domain name and hosting
- Extra plugins or theme (optional)
The following section will help you understand how to get each of the above-mentioned items.
The WordPress software

To download the free WordPress framework, you can simply navigate to the WordPress.org site and download the latest version of WordPress.
You won’t even have to download the software separately if you are going for WordPress-based hosting. Such a hosting package will automatically download the latest version of WordPress and install it for you. It will also provide an optimized environment for hosting the WordPress sites, to ensure better performance.
A WordPress Theme or a wiki WordPress plugin

For creating a wiki website, you will either need a WordPress Wiki theme or a plugin for the same purpose.
We will use the BasePress plugin to create an internal wiki and therefore, you don’t need to invest in a premium WordPress theme to create your site.
You can use the default WordPress themes, or download a free WordPress theme from the WordPress theme repository if you want a different design. We recommend using a premium WordPress knowledge base and wiki theme if you want to create an internal wiki with a WordPress theme instead of a plugin.
But creating an internal or external wiki website with WordPress is so easy and manageable with the BasePress plugin, there would be no reason to opt for a premium theme instead of the wiki plugin.
Domain name and hosting

Since WordPress is not a self-hosted platform, you will also need a domain name & hosting service.
Well, the good thing is the availability of a plethora of options when it comes to hosting and domain name. You can rely on any of the reliable hosting services & domain name registrars like GoDaddy or Bluehost.
There are so many good hosting services that let you choose from different hosting packages with premium services, the best uptime, and great support. You can find great offers (like a free domain with a yearly hosting subscription) and so on.
Extra theme or plugins(optional)
If you want more features, WordPress lets you add as many as you want in the form of additional plugins or add-ons. And that is the beauty of using WordPress as your platform to create an internal wiki site.
Extra plugins can be an image optimizer, an add-on for the Gutenberg editor, a contact form plugin, or a caching or a backup plugin.
If you want to build an internal wiki in conjunction with a company website, you can rely on one of the business themes for WordPress and use the BasePress plugin to create a wiki attached to it.
3) Installing the services and setting up WordPress

To get started with your internal wiki, you will have to set up the services and install the software. Even though it sounds like a difficult task, it actually is pretty simple and doesn’t take more than just a few minutes.
- Connecting the host and domain name
- Installing WordPress
- Installing WordPress theme, or the plugin
Once you perform these three operations, you will have an internal wiki ready to be structured and then loaded with data.
Connecting the host and the domain name
This step will typically be performed with the hosting cPanel. There are different ways for different hosts to let you choose the domain name when you decide to start with a new site.
However, if you have opted for a premium hosting package, and choose to create a new site, the options should be easily provided. You will be asked to choose a domain name for the site, and even to choose a website building platform.
Here, you can choose WordPress and eliminate the requirement to download and install WordPress manually.
Downloading and Installing WordPress
Therefore, by choosing WordPress you will have the latest WordPress version downloaded and installed for you.

But if it doesn’t follow the instructions in this tutorial to install WordPress on any host.
At the end of this process, you will have a WordPress setup ready, along with a username and password to login into your WordPress dashboard.
Installing WordPress theme or Plugin for building internal Wiki
Use your credentials to log in to your WordPress site, and its time or us to install the WordPress plugin to create an internal wiki.
Since we are using the BasePress plugin to create the site, we can settle for a default theme, and use the BasePress plugin to set up an internal wiki.

The BasePress plugin is built to let you create an easy knowledge base or wiki with the easiest interface and simple dashboard options.
4) Setting up the Internal Wiki Plugin
The BasePress plugin provides you with a great way to create an internal wiki, organize, store and distribute the internal company data.
You can download the BasePress plugin, and log in to your WordPress dashboard to find the installation screen at wp-admin >> Plugins >> Install New.

Upload the zip file and you can click on install now to start the installation of your plugin. Once you install it, activate it right away to include the feature of a knowledge base/online wiki on your site.
You can install this on your existing WordPress site to create an internal wiki. But it is very important to take the backup of your website before you add any new plugin to your site. You can also use one of the latest backups in a test environment before you make changes to the live site.
However, even if you don’t already have an existing WordPress website, and are starting from scratch, you can start with the default WordPress Theme and set up a simple homepage for your internal wiki powered by BasePress.

Later in this guide, is a section that will help you set your internal wiki page as the homepage of the site.
However, once the plugin is active, you will see a prompt to set up your knowledge base/wiki. Click it to go ahead and set up your online wiki.
1) The name of the wiki and slug
This step allows you to set up the name/title for your internal wiki. You can set one as per your requirements, and another one will help you choose the slug.

It is a great tool for you if you already have an existing WordPress site. Then BasePress will add the info/wiki section as a sub-folder and the URL of this section can be something like:
www.brightcorp.com/wiki
2) Adding it to the menu
You can choose the menu of your site to start showing your knowledge base as a menu option. You can also add it to the menu using the WordPress dashboard option – at WordPress > Appearance > Menus.
3) Choose the wiki theme
The BasePress plugin allows you to choose from pre-designed templates for your internal wiki. You can choose from one of the three available options and proceed to the next step.

4) Other settings
On this page, you will find other settings, with explanations below each of the options. You can set them as per your requirements, and proceed to the next step.

5) Setup Complete

With the previous 4 steps successfully completed, your internal wiki has been set up and in the next section, we will see how to set up the structure of your Internal Wiki using BasePress.
5) Preparing the WordPress Internal wiki for wiki articles
For an internal wiki, you will need to organize the content
The next step will be to organize your wiki’s structure to accommodate the company’s knowledge and information. The BasePress allows you to organize it in three levels.
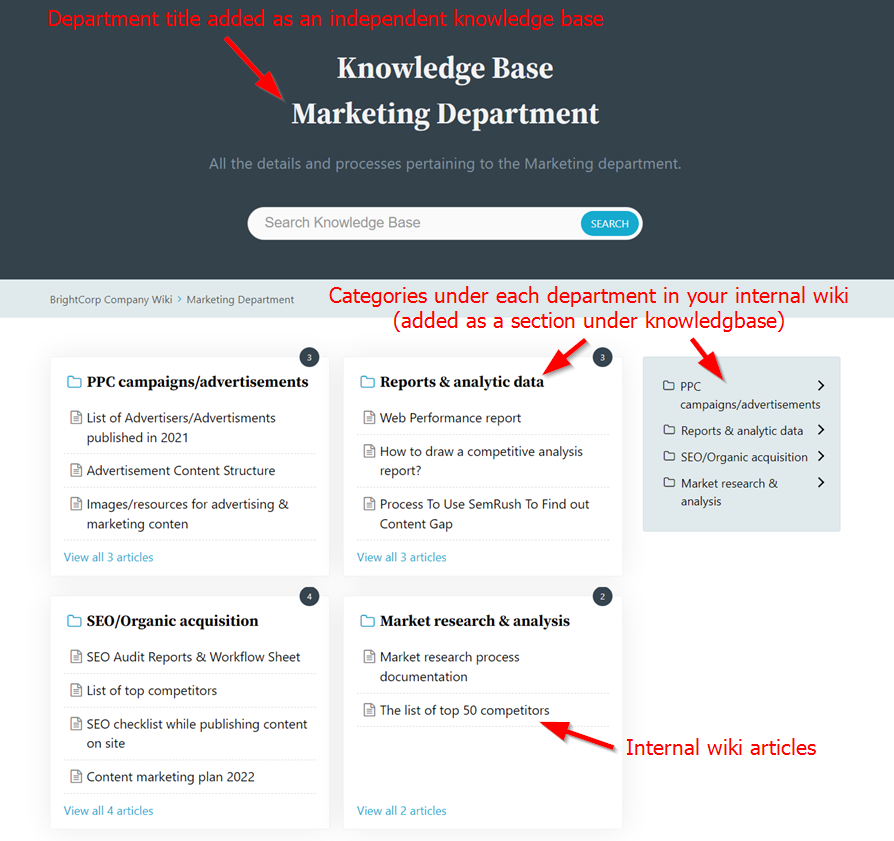
- Knowledge Base (Wiki Main Topic/Department)
- Section (Sub topics under the department)
- Knowledge base article
- Section (Sub topics under the department)
If you want to create an internal wiki with content organized under different departments, then the multiple knowledge base option of your internal wiki BasePress plugin is ideal for you. This option is enabled by default.
The Departments in your internal wiki
BasePress is a plugin that will allow you to create a group of knowledge repositories. Of course you can opt to create just one knowledge base, but if you need to properly distinguish the different wiki articles, according to the departments, or usage, we highly recommend using this option.
so, you can create a separate knowledge base for different departments. and organize the articles under different sections.

Alternately, you can completely eliminate the option of knowledge base and choose to work with just sections, and articles under them by navigating to the Dashboard > BasePress > General > Single Knowledge base mode.
However, we’d like to keep the option of multiple knowledge bases enabled and create different knowledge bases for different departments. We can use the sections as different subjects or categories under the department, with articles for the specific category under them.

The knowledge bases (departments in our case) will appear on the front end in the order as seen at Dashboard > Knowledge base > Manage Kbs.
However, from the same page, you can re-order the knowledge bases (departments) using the drag and drop options.

The Sections under each department (Categories)
Under each of the knowledge bases, you can have multiple sections, that we can consider categories.
So each department can have articles under different campaigns. For instance: The Marketing department can have its documents organized as “SEO/Organic acquisition”, “PPC campaigns/advertisements”, and “Reports & analytic data”.

Knowledge Base Articles
You can select the department, the category under the department, and choose to add an article to it.
Therefore, you can create an internal wiki with beautifully organized content with the BasePress knowledge base plugin.
so, you can simply navigate to Knowledge base > Add New Article and start creating the content. However, make sure to choose the proper knowledge base & section for each of the articles so that they are organized into the right place.

Create contributors
The beauty of an internal wiki is that it can have a number of contributors. This will make it more resourceful and help your company gather the knowledge of multiple professionals at one reserve.
Therefore it is very important for you to create different contributors or authors that can submit their articles to your internal wiki. Now again, one of the greatest reasons for WordPress to be suitable to different genres of websites is how it allows you to add unlimited users and also helps with the primary level of access control.
If you are using the BasePress plugin, you can upgrade it to the premium version to access different access control options. It will make your task way easier.
However, another way to do it is through your WordPress dashboard’s users menu. As an contributer, the user will be allowed to add articles to the internal wiki.
However, they won’t have the option to create the knowledge base, or sections. And understandably, the assignement of departments and sections, will need to be done my an administrator and not contributors.
What contributors can do is add an article and choose from the list of knowledge base(Departments) and sections (categories) and publish the content.
Setting up a search feature on your internal wiki
An internal knowledge base or a company wiki definitely needs a great search feature to help the employees find the content of their interest easily.
And the BasePress plugin for internal wiki comes with an advanced search system. The free version lets you create an internal wiki with some search-related options for you to decide how the content is found on your online wiki.

6) Adding the wiki articles
The last and final step would be adding the wiki articles. You can organize the teams to prepare an outline of what content needs to be added to the wiki. But before that, the question is – what data does an internal wiki typically consists of?

A typical internal or company wiki can consist of the following (or more):
- Employee manuals, company policies, internal memos, and so on
- Work processes and procedures, workflow
- Information about schedules, events, plans, etc.
- Technical doumentations
- Employee training, software access information, and onboarding materials
However, it always depends on the company/firm to decide what data it wants its internal wiki to have.
You can either come up with a list of topics of wiki articles, or an entire structure of the internal wiki. The next step would be assigning the content writers/contributors the topic and allowing them to upload it to the internal wiki.
There should also be a way of moderating all the content that is added to the internal wiki so that all the company information and processes that are listed there, are checked for errors, and corrections are made to ensure the reliability of the information.
The content plays an important part when it comes to an internal wiki, and you can use one of these content creation tools to document your wiki articles.
Conclusion
At the end of the process, you will have a complete internal wiki with well structured articles and organized content.
Internal wikis or company wikis have made it easy for big as well as small organizations to manage their content easily.
And since there are a number of tools that you can use to create an internal wiki with WordPress. All of these alternatives are really easy to use and reliable.
An internal wiki created in such a way can help your organization in multiple ways and prove to be totally worth the efforts needed to create it.

